# 创建服务消费者(Ribbon)
# 概述
在微服务架构中,业务都会被拆分成一个独立的服务,服务与服务的通讯是基于 http restful 的。Spring cloud 有两种服务调用方式,一种是 ribbon + restTemplate,另一种是 feign。在这一篇文章首先讲解下基于 ribbon + rest。
# Ribbon 简介
Ribbon 是一个负载均衡客户端,可以很好的控制 http 和 tcp 的一些行为。
# 准备工作
- 启动服务提供者(本教程案例工程为:
hello-spring-cloud-service-admin),端口号为:8762 - 修改配置文件的端口号为:
8763,启动后在Eureka中会注册两个实例,这相当于一个小集群

# 创建服务消费者
创建一个工程名为 hello-spring-cloud-web-admin-ribbon 的服务消费者项目,pom.xml 配置如下:
<?xml version="1.0" encoding="UTF-8"?>
<project xmlns="http://maven.apache.org/POM/4.0.0" xmlns:xsi="http://www.w3.org/2001/XMLSchema-instance"
         xsi:schemaLocation="http://maven.apache.org/POM/4.0.0 http://maven.apache.org/xsd/maven-4.0.0.xsd">
    <modelVersion>4.0.0</modelVersion>

    <parent>
        <groupId>com.starmcc</groupId>
        <artifactId>hello-spring-cloud-dependencies</artifactId>
        <version>1.0.0-SNAPSHOT</version>
        <relativePath>../hello-spring-cloud-dependencies/pom.xml</relativePath>
    </parent>

    <artifactId>hello-spring-cloud-web-admin-ribbon</artifactId>
    <packaging>jar</packaging>

    <name>hello-spring-cloud-web-admin-ribbon</name>
    <url>http://www.starmcc.com</url>
    <inceptionYear>2019-Now</inceptionYear>

    <dependencies>
        <!-- Spring Boot Begin -->
        <dependency>
            <groupId>org.springframework.boot</groupId>
            <artifactId>spring-boot-starter-web</artifactId>
        </dependency>
        <dependency>
            <groupId>org.springframework.boot</groupId>
            <artifactId>spring-boot-starter-tomcat</artifactId>
        </dependency>
        <dependency>
            <groupId>org.springframework.boot</groupId>
            <artifactId>spring-boot-starter-thymeleaf</artifactId>
        </dependency>
        <dependency>
            <groupId>org.springframework.boot</groupId>
            <artifactId>spring-boot-starter-actuator</artifactId>
        </dependency>
        <dependency>
            <groupId>org.springframework.boot</groupId>
            <artifactId>spring-boot-starter-test</artifactId>
            <scope>test</scope>
        </dependency>
        <!-- Spring Boot End -->

        <!-- Spring Cloud Begin -->
        <dependency>
            <groupId>org.springframework.cloud</groupId>
            <artifactId>spring-cloud-starter-netflix-eureka-server</artifactId>
        </dependency>
        <dependency>
            <groupId>org.springframework.cloud</groupId>
            <artifactId>spring-cloud-starter-netflix-ribbon</artifactId>
        </dependency>
        <!-- Spring Cloud End -->

        <!-- 解决 thymeleaf 模板引擎一定要执行严格的 html5 格式校验问题 -->
        <dependency>
            <groupId>net.sourceforge.nekohtml</groupId>
            <artifactId>nekohtml</artifactId>
        </dependency>
    </dependencies>

    <build>
        <plugins>
            <plugin>
                <groupId>org.springframework.boot</groupId>
                <artifactId>spring-boot-maven-plugin</artifactId>
                <configuration>
                    <mainClass>com.funtl.hello.spring.cloud.web.admin.ribbon.WebAdminRibbonApplication</mainClass>
                </configuration>
            </plugin>
        </plugins>
    </build>
</project>
1
2
3
4
5
6
7
8
9
10
11
12
13
14
15
16
17
18
19
20
21
22
23
24
25
26
27
28
29
30
31
32
33
34
35
36
37
38
39
40
41
42
43
44
45
46
47
48
49
50
51
52
53
54
55
56
57
58
59
60
61
62
63
64
65
66
67
68
69
70
71
72
73
74
2
3
4
5
6
7
8
9
10
11
12
13
14
15
16
17
18
19
20
21
22
23
24
25
26
27
28
29
30
31
32
33
34
35
36
37
38
39
40
41
42
43
44
45
46
47
48
49
50
51
52
53
54
55
56
57
58
59
60
61
62
63
64
65
66
67
68
69
70
71
72
73
74
主要是增加了 Ribbon 的依赖
<dependency>
    <groupId>org.springframework.cloud</groupId>
    <artifactId>spring-cloud-starter-netflix-ribbon</artifactId>
</dependency>
1
2
3
4
2
3
4
# Application
通过 @EnableDiscoveryClient 注解注册到服务中心
@SpringBootApplication
@EnableDiscoveryClient
public class WebAdminRibbonApplication {
    public static void main(String[] args) {
        SpringApplication.run(WebAdminRibbonApplication.class, args);
    }
}
1
2
3
4
5
6
7
2
3
4
5
6
7
# application.yml
设置程序端口号为:8764
spring:
  application:
    name: hello-spring-cloud-web-admin-ribbon
  thymeleaf:
    cache: false
    mode: LEGACYHTML5
    encoding: UTF-8
    servlet:
      content-type: text/html

server:
  port: 8764

eureka:
  client:
    serviceUrl:
      defaultZone: http://localhost:8761/eureka/
1
2
3
4
5
6
7
8
9
10
11
12
13
14
15
16
17
2
3
4
5
6
7
8
9
10
11
12
13
14
15
16
17
# Configuration
配置注入 RestTemplate 的 Bean,并通过 @LoadBalanced 注解表明开启负载均衡功能
@Configuration
public class RestTemplateConfiguration {

    @Bean
    @LoadBalanced
    public RestTemplate restTemplate() {
        return new RestTemplate();
    }
}
1
2
3
4
5
6
7
8
9
2
3
4
5
6
7
8
9
# 创建测试用的 Service
在这里我们直接用的程序名替代了具体的 URL 地址,在 Ribbon 中它会根据服务名来选择具体的服务实例,根据服务实例在请求的时候会用具体的 URL 替换掉服务名,代码如下:
@Service
public class AdminService {

    @Autowired
    private RestTemplate restTemplate;

    public String sayHi(String message) {
        return restTemplate.getForObject("http://HELLO-SPRING-CLOUD-SERVICE-ADMIN/hi?message=" + message, String.class);
    }
}
1
2
3
4
5
6
7
8
9
10
2
3
4
5
6
7
8
9
10
# 创建测试用的 Controller
@RestController
public class AdminController {

    @Autowired
    private AdminService adminService;

    @RequestMapping(value = "hi", method = RequestMethod.GET)
    public String sayHi(@RequestParam String message) {
        return adminService.sayHi(message);
    }
}
1
2
3
4
5
6
7
8
9
10
11
2
3
4
5
6
7
8
9
10
11
# 测试访问
在浏览器上多次访问 http://localhost:8764/hi?message=HelloRibbon
浏览器交替显示:
Hi,your message is :"HelloRibbon" i am from port:8762
Hi,your message is :"HelloRibbon" i am from port:8763
1
2
2
请求成功则表示我们已经成功实现了负载均衡功能来访问不同端口的实例
# 此时的架构
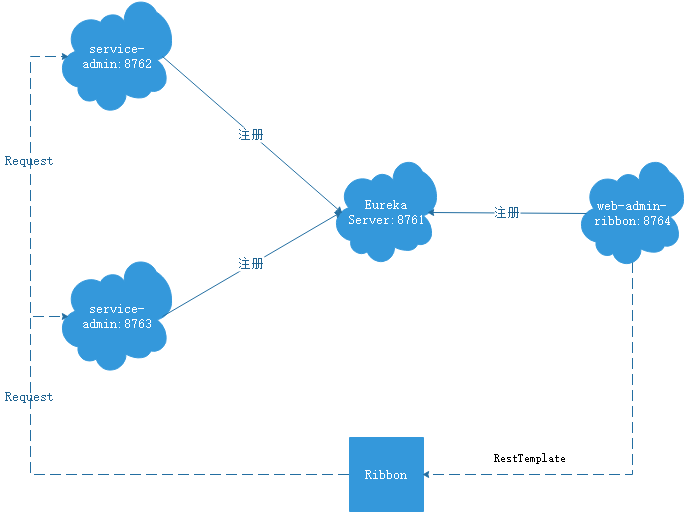
- 一个服务注册中心,
Eureka Server,端口号为:8761 service-admin工程运行了两个实例,端口号分别为:8762,8763web-admin-ribbon工程端口号为:8764web-admin-ribbon通过RestTemplate调用service-admin接口时因为启用了负载均衡功能故会轮流调用它的8762和8763端口
# 附:在 IDEA 中配置一个工程启动多个实例
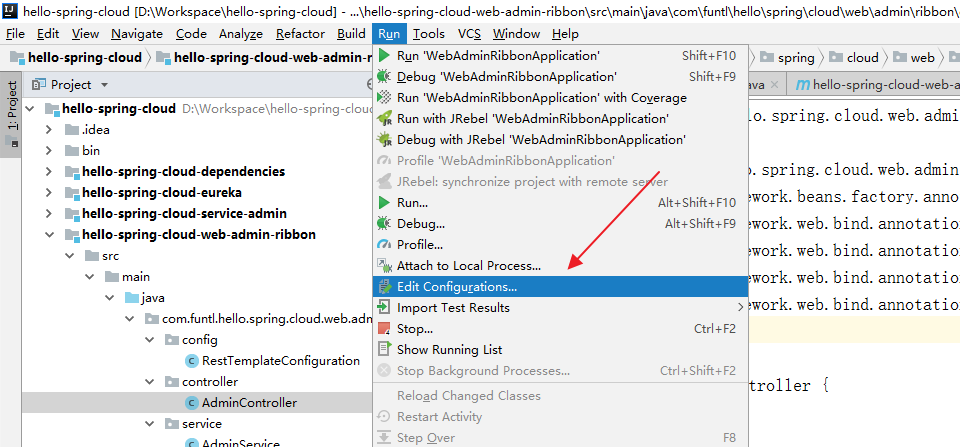
# 步骤一
点击 Run -> Edit Configurations...
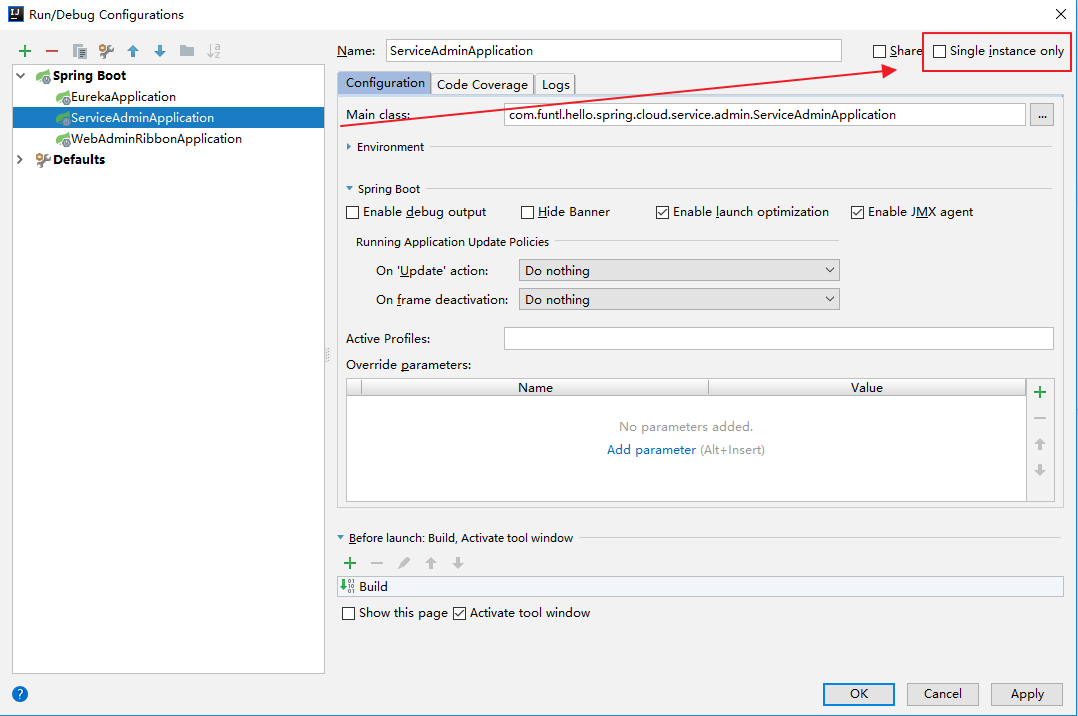
# 步骤二
选择需要启动多实例的项目并去掉 Single instance only 前面的勾
# 步骤三
通过修改 application.yml 配置文件的 server.port 的端口,启动多个实例,需要多个端口,分别进行启动即可。